Monday, January 11, 2016

Terracotta and Stone Fire Bowl


I’ve always wanted a tabletop fire. The flames swirling and twisting are so pretty, but I wasn’t sure how to make one so I searched Google and looked at the DIY projects on the Internet.

Discouragingly, most DIY tabletop fires are pretty ugly because you can see the can of gel fuel. The gel cans were generally nestled in a bed of shattered glass, but a few were nested in small rocks. There were a few projects with instructions for making the bowl part from concrete, which seems like a lot of effort, and a bunch projects with flowerpots and bowls. The projects seemed like exercises in publishing a project that matches the fire bowl fad without really considering the success of the end product. Other than the cement projects, the ones I saw the used the minimum amount of thought in the construction and just seemed thrown together to create content. Why waste any time on something that is so disappointing? 


Sources clockwise from left: http://todayscreativelife.com/diy-tabletop-fire bowl/http://www.bhg.com/home-improvement/porch/outdoor-rooms/improve-small-backyard/#page=10, http://www.birdsandblooms.com/blog/easy-tabletop-diy-fire-pit/,  http://www.homerepairtutor.com/diy-gel-fire-pits


I wanted an organic feel to the fire bowl and I like the contrast between rough terracotta and smooth river rock so I went with a large terracotta flowerpot saucer I already had and some rocks left over from various other projects.

At first, I thought I could cover the ugly cans by putting a screen of some sort on top of them and then cover the screen with the rocks. I needed the screen to be sturdy enough to hold the rocks on top of it in place when it was lifted to replace the cans.

To do a proof of concept test I decided to use the top of a basket intended for use on the barbecue because it was quite rigid. I put three cans of Sterno in my flowerpot saucer, surrounded them with rocks, lit the cans, put the basket lid over the cans, and covered that with more rocks. This was not a success. The major problem was that Sterno flames are small, blue, and not particularly pretty. Some blogs mentioned a gel fuel called Real Flame, which might have a small yellow flame, but it isn't available where I live. It also became apparent that the screen idea wouldn't work because I would have to rebuild the fire bowl every time the cans ran out. Therefore, I had to go with plan B.

Plan B was to use propane as my fuel. On the positive side, you get a beautiful flame, it's cheap, the flame is adjustable, you don't have to change out the fuel frequently, and once the fire bowl is set up you won't have to touch it again. On the negative side, a hole would have to be drilled through the ceramic saucer and the gas ring and line would have to be sourced and built from scratch.


Sourcing the parts was the most difficult part of this project. The 12" stainless steel gas ring was purchased from eBay as my local barbecue shops were charging twice as much for the exact same part. Most of the other parts came from our local hardware store and propane supplier. The only thing my husband and I truly had trouble finding was the regulator that goes from the propane tank to the adapter to the valve. After a lot of frustration, I remembered our old gas tabletop heater and Tony was able to take it apart so we could use the regulator inside.


The final fire bowl parts list (in order):
12" stainless steel fire ring
15" flowerpot saucer
Miscellaneous drill bits in various sizes
Stepped drill bit
Wood to support the saucer during drilling
Connector from ring to the hose
Hose
Adaptor from the hose to the valve
Valve
Adaptor to regulator
Regulator
Propane tank
Small rocks
Medium rocks

Drilling the hole in center of the saucer was much easier than I expected. I think the secret to our success was that the saucer was never expected to support it's own weight while we drilled the center hole. When my husband, Tony, drilled from the top, he drilled into some wood below. When he turned the saucer over to drill from the other side, we filled it with smaller pieces of wood so the brittle ceramic never felt any downward pressure. Tony started with a smaller bit and went up a few sizes to make the hole bigger and bigger, but we had to use the stepped drill bit above to get the hole big enough for the adapter for the hose to go through. We should have drilled the hole a little larger than the hose because we had some problems with the saucer not draining properly after it rained. The fix was pretty easy - we just jiggled the hose and the rain drained out, but we should have thought this through better.

Once the hole was drilled, I put the gas ring in the saucer and Tony attached the adaptors, hose, valve, regulator, and the propane tank. We had a problem with the small propane tank falling over on its side so I put it in a flowerpot, which had the weight needed to keep it upright. This is important because you want the propane gas, which sits on top of the liquid propane at the bottom of the tank. We used a small tank and refilled it from our larger tank because the large tank won't fit under our table. You can find adapters for this on Amazon.

When I put the rocks in, I put a few small ones under the gas ring so rainwater would drain from the hole and then covered the ring. It's best to use a mixture of small and medium rocks to cover the gas ring. You'll need the small rocks to fill in between the medium ones to get maximum coverage. Don't worry about blocking the gas holes.

In the interests of full disclosure, we did have one major problem. Since we didn't use rocks specially sold for this purpose or maybe because we didn't use a particular type of rock, we did have problems with rocks cracking apart during use. We used the extremely unscientific popcorn method for resolving this problem. We put our fire screen in front of the bowl to catch anything flying out until the popping stopped, which took 5-6 uses.

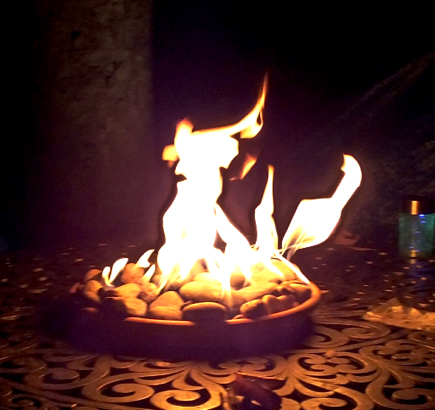
Now we have a beautiful fire bowl that is absolutely mesmerizing to watch while we sit and talk outside. As a bonus, it warms us much better than out tabletop heater ever did.


Monday, December 22, 2014

Hopefully, Some Street Cred - My Own Project

Travel Jewelry Roll


Travel Jewelry Roll
This week I’m going to discuss one of my projects from start to finish. From the point when I tried to buy what I needed, to giving up and trying to find a pattern, to biting the bullet and creating my own pattern, to finally making it. Notice the progression is the opposite of the more common process of making something and then desperately trying to find a use for it:

Fancy Tiger Crafts
My husband and I love to travel and we go on trips frequently. The travel jewelry box I'd been using was very basic and my necklaces would tangle on the flight out. Sometimes the chains would get snarled around earrings and the whole mess would become one big lump. Only vast reserves of self control prevented me from taking the Alexander the Great approach to getting everything separated. It was time to get a better travel organizer.

Typical travel wallet tutorial Sew Crafty Jess
Originally I didn’t want to make anything, but all the travel organizers I saw online would occupy too much space in my suitcase and didn’t resolve the tangling problem. Once I realized the sad truth that I wasn’t going to able to buy what I needed, I looked through Pinterest, Etsy, and did a general Google search for patterns with no luck. Every project I found used some arrangement of zippered compartments and I would need one for each necklace plus one for earrings. My older daughter uses zip lock bags to store her jewelry, which is pretty much the same thing. FYI, the tutorial for the clutch to the right is good although the end result isn't what I was looking for. I've put vinyl pockets on all sorts of things and this tutorial is quite clear on how to do this.

This whole project fell off my radar for ages because I had no idea how to keep the necklaces separated. One morning at breakfast I suddenly flashed on the solution. Here is the pattern and the finished roll. 


The solution was to weave ribbon (or cord) through some type of hole and then hang my necklaces from the ribbons. Here is a close-up:


There were multiple considerations in the design of this project:
  1. How can I make this as easy and as convenient as possible to use?
  2. What is the average necklace width? This determines the distance between the rows of holes. I decided to loop the longer necklaces through the ribbons twice, which has worked very well.
  3. Generally speaking, what is the drop depth of a necklace (how far will it hang down)? The drop length determines how much space is needed between each set of holes.
  4. How many necklaces do I want to carry verses how long I can realistically make this thing and still keep it practical? I had to face harsh reality and decide how much jewelry I really need to take.
  5. What type of hole should I use? Grommets or buttonholes? Grommets maintain the project’s shape better, but you can make buttonholes in many shapes and sizes and they can be stabilized with interfacing. I went with grommets because I had them lying around looking for a use. It was very difficult to place them precisely as you can see from the photo above. The hole punch is in a blind spot on the grommet tool and so it was difficult to line it up with my mark on the fabric. I’m going to experiment with different punch techniques next time I use grommets or go with a pretty buttonhole. 
  6. What is the optimum distance between holes in each pair? This was a total shot in the dark. It has to be easy get my fingers under the ribbon to attach the necklace, but if the holes are too far apart the roll will hold fewer necklaces.
  7. How rigid does the travel roll need to be? The roll needs to have some body from side to side or it will be too floppy to be easy to use, but using flat sides and folding it instead of rolling requires more precise planning and measurement. I decided to use fusible batting, which has nice body and to roll the organizer.
  8. How am I going to keep this thing closed? Snaps? Velcro? Toggles? Ties? Ties are by far the easiest to sew so I cut myself some slack and went with that. 
  9. Structurally, what was a good distance between the hole and the edge? This was a total guess based on what I thought would look nice.
  10. Do I want to add a compartment for earrings?  How big do I want it? Absolutely I wanted a zippered compartment, but I balanced that against how much of a pain in the ass it is to add one. Eventually, I realized that I’d have to carry my earrings in something and it would be easier to have everything in one place. The next time I make this, the compartment will go at the top because the necklaces will be more protected if they are on the inside the roll. If I had wanted to carry bracelets, I would have made the compartment deeper and factored that into my calculations.
  11. Wash at your own risk. This sucker is not going to be fun to iron. The organizer would be easier to iron if I had decorated the back differently and used vertical or horizontal lines of stitching to quilt it somewhat. I love the look of the giant heart, but depending on the likelihood of the organizer getting dirty, you may want to consider other decoration and using cord instead of ribbon. The organizer can probably go through the wash, particularly if you use a lingerie bag, but dry it flat.
I already had virtually everything I needed for this project and the beautiful machine embroidery is a freebee from Urban Threads. The only thing I bought was the ribbon.  I'm not happy with the stiffness in the placement of the initials. Unless some research turns up helpful advice, I’ll skip the monograming in the future.

When I make organizers for my daughters, I’ll put together a tutorial with actual pattern pieces, but for now here’s a brief overview:

Materials
  1. Front fabric
  2. Back fabric
  3. Fusible batting
  4. Piping or binding
  5. Ribbon or cord
  6. Vinyl
  7. Contrasting thread
  8. Fray Check
  9. Zipper, can be longer than necessary
  10. Optional: grommets
  11. Optional: machine embroidery design
  12. Optional: embroidery thread

Directions
  1. Embroider the back piece, then cut to size and fuse the batting to it.
  2. Cut the front piece.
  3. Cut the vinyl the width of the fabric and the height you want plus at least one inch on all sides.
  4. Cut lengthwise completely across the strip of vinyl an inch from the top edge. These two pieces form the compartment opening.
  5. Attach the zipper to the vinyl pieces. All you have to do is to topstitch the vinyl to the sides of the zipper. Close zipper. Square up the finished compartment if needed.
  6. Carefully clamp the vinyl compartment to the right side of the front fabric with small binder clips. Make sure you place the zipper slide just far enough from the edge of the fabric that it doesn’t get caught in the seam allowance with about a ¼ inch gap between the slide and the seam.
  7. Use whatever decorative stitch you like to attach the pouch to the front of the roll. Just remember that you can’t use a dense stitch on vinyl without risking tearing it. I used blanket stitch in a thread color that matched the zipper.
  8. Cut off any vinyl and zipper that extends beyond the edge of the fabric.
  9. Decide how difficult you want to make this for yourself. Do you want to add piping or binding? Projects like this look much more finished and hold their shape better if you go the extra mile and use one of the two. They’re both a pain.
  10. I basted the piping and the ribbon ties in place on the right side of front piece before sewing the front to the back because piping always moves around during stitching. Overlap the ends of the piping somewhere inconspicuous and don’t cut them to fit yet. That’s asking for trouble. Leave the ribbons fairly long so you can adjust the length once the entire project is finished.
  11. CAREFULLY sew the front to the back with right sides together leaving a gap to turn everything right side out. I left the whole top end open due to the thickness of the fabric sandwich (making it harder to turn), but I’d probably leave a smaller gap next time. You will need a special foot to attach piping. Some machines have a zipper foot you can use because the foot allows you to stitch next to the cord. My machine (Viking Designer Diamond) needs a dedicated piping foot. Adjust your needle position so that it catches the fabric sandwich in just the right spot. I’d test this on a swatch first. Seriously, it’s worth it. Fixing piping is a major pain.
  12. Pull the organizer through the opening so it's right side out. Once you're happy with the piping, hand or machine stitch the opening closed.
  13. Mark the grommet holes. 
  14. Insert the grommets. Good luck with this. There’s no fixing the holes once you make them.
  15. Thread ribbon through the grommets leaving extra length at each end.
  16. Tie off the ribbons at each end of the roll and trim them on a slant. Put a thin line of Fray Check along the cut edges.
  17. Roll the clutch and tie it a few times to get a feel for how long you need the ribbons tying it closed to be. Once you have a look you like, and with the clutch still rolled and tied, cut the ribbons leaving a fairly long tails to ensure it's always easy to tie. Trim the ends on a slant and put a thin line of Fray Check along the cut edges.

I loved making this travel jewelry organizer and use it all the time. Notice that it’s not a cover for something that doesn’t need one (cozy), won’t gather dust as yet another useless knickknack, sit around waiting for a use and eventually get tossed, doesn’t make something that's straightforward more difficult (most handmade coffee cup insulators for example), or is so difficult to use that I'd never use it. This is what I mean when I say that making things is awesome and rewarding and there’s absolutely no need to make crap just to make something. The bigger crafting blogs have to continually come up with projects to retain their advertising revenue (determined by the number of pins, subscribers, tweets, etc.) so they post a lot of things that aren’t worth making or only take a good photo. Many of those blog posts are worth reading to learn a technique or find out about a new product. Just don’t make those terrible projects.